


Director - First steps
First steps as a Director
As an administrator, you are responsible for the initial structuring of the platform. This step is essential to enable other users (editors and simple users) to work efficiently. Here are the first steps you need to take to get started quickly:
- Create your first team to group users by entity, department or project.
- Create a project, which will serve as a framework for defining classification plans and hosting dashboards.
Once these elements have been configured, editors will be able to create visualizations, and users will be able to access results via dashboards.
Administrator: Create your first team and project
Invite a user
Steps for inviting a user :
- Access Organization Settings: The user is taken to the "Home / Organization" page. This page displays the "Organization Settings" (Name, API Key) and the "Access Management" section.
- Locate the Invite Function: Under the list of existing users ("Access management"), the user locates the "Invite a user" button.
- Open the Invitation window: Click on the "Invite a user" button. A popup window entitled "Invite a user" appears.
- Enter Email: Fill in the "Email" field with the email address of the person you wish to invite.
- Enter Name: Fill in the "Name" field with the full name of the person to be invited.
- Send Invitation: Click on the "Invite" button in the modal window.
- Visual confirmation :
- The modal window closes.
- A temporary success message appears at the top of the main page ("✅ Guest user").
- Note: The list of users in "Access management" is not updated immediately; the invited user must accept the invitation and finalize his account to appear in the list.
The user receives an email to finalize registration and choose a password.

Create a team and add users
Team creation steps :
- Go to the Teams section : The user is already on the page listing existing teams ("Home / Teams").
- Initiate creation: Click on the "Create a team" button.
- Access the Creation form: The interface displays a new form entitled "Create a team".
- Name the team: Fill in the "Name" field with the desired name for the new team.
- Select Members :
- Click on the "Members" field.
- A drop-down list of available users appears.
- Select one or more users from the list. Selected members appear as "tags" in the field.
- Confirm creation: Click on the "Create" button.
- Visual confirmation :
- The user is redirected to the team list.
- A temporary success message appears at the top ("✅ Team created").
- The new team appears in the team list.
Type of rights :
- Owner: can add and/or remove users from the team, can transfer ownership to another member
- Editor: can add and/or remove users from the team
- Member: belongs to the team without the possibility of modifying it
Practical tips:
Given that project access rights (reading and/or editing) are assigned at team level and not to individual members, and that "editor" status within a team has no bearing on the ability to edit a project, we recommend creating two separate teams: one for editors and one for readers. Even if, in your organization, these roles coexist within the same team, this technical separation makes it easier to manage project access rights.
Creating a project
To create a project, access the "Project" tab from your interface. Depending on the roles assigned to users, some will be able to create and manage projects. This flexibility allows you to organize your analyses according to specific criteria to refine your results.
During creation, you can define a name, add a detailed description and configure access rights to guarantee optimal, secure management.
The Projects page lets you access and configure the various projects available on the platform. You'll find several options for consulting dashboards, modifying classification plans and managing general project parameters.
Configuration of the Classification Plan :
Access: In the project list, click on "View" for the relevant project.
Navigation: In "General settings", scroll down to "File plans" and click on "Add a file plan".
Configuration:
- Give your plan a name in the "Name" field
- Add main topics via "Add a topic" and rename them
- Create sub-topics by unfolding a topic (>) then clicking on "+" next to "Sub-topics".
- Define sorting rules in the "Sorting rule" fields for each topic/subtopic
- Associate data sources: "Add a data source" → select sources → "OK" → choose fields to analyze → select the fields to be analyzed
- Click on "Create" to finalize
The plan will then appear in the list of classification plans on the "General settings" page .
Adding a team to a project
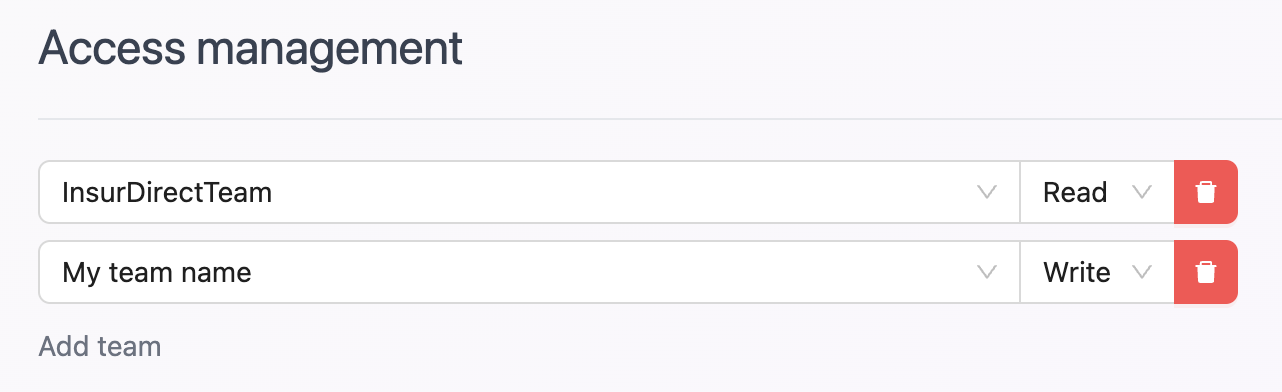
In the project editing section, you can add teams with two levels of access: READ (read-only) or READ & WRITE (read and modify).
- All users belonging to a team with access to the project can view the associated dashboards.
- Team members with WRITE access can create and modify project dashboards in addition to viewing them.
Data source access management
Provide access to the various data sources available.
If a user does not have access rights to the data sources associated with a dashboard, a "No data available / Aucune donnée disponible" error message will be displayed.
What's more, two users with different access to data sources won't necessarily see the same information or the same results on the same dashboard.
There you go!
You now have all the keys you need to structure your work environment: create teams, set up your first projects and filing plans. All that's left to do is get started and discover the many features the tool has to offer.